Advanced Monitoring of Fluentd with Datadog and Rollbar : Part 2 : Visualizing & Alerting

(This post is part 2/2 in a series. For part 1, see: Part 1 : Instrumentation & Collection)

In part 1 of this series we went over how to instrument Fluentd so that it sends its errors and metrics to the monitoring services Datadog and Rollbar. In this post, we’ll cover how to effectively visualize and alert using those metrics.

Visualizing & Alerting with Datadog

Dashboard Template Variables

template-variables

Before jumping into the visualization themselves, it would be helpful to see how we have templatized the variables in our dashboards, so that one can quickly change the scope of all visualizations in that dashboard. For a complete guide on this powerful Datadog feature, see their Guide to Dashboard Templating.

Template variables we use:

  • $account-name: Account or environment name. Ex: “dev”, “stage”, “prod”, etc.
  • $realm: Twilio is a multi-region SaaS provider. Realm is analogous to the geographic region of a host. Ex: “usa”, “brazil”, “japan”.
  • $role: Functional type of the host. Ex: “mysql-master”, “mysql-slave”, “kafka”, “sms-sender”, etc.
  • $host: Host ID. We use an internal instance ID at Twilio, but AWS instance ID would also work.
  • $fluentd-tag: Thanks to the custom fluentd/dogstats instrumentation we built in part 1 of this post, we have metrics on bytes/sec and messages/sec tagged with their Fluentd tag. Ex: “nginx_access”, “nginx_error”, or “haproxy”.
  • $active: Load balancer state. Ex: “in-load-balancer” or “out-of-load-balancer”.

These template variables allow an operator to quickly modify all charts on a dashboard to visualize answers to questions like:

  • How much memory is being used by Fluentd in “prod” on all “mysql” hosts?
  • How much CPU is being used by Fluentd in “prod” by any 1 host?
  • How many “nginx_access” messages/sec are being sent in “prod” in Japan by all “kafka” hosts that are in-load-balancer?

Fluentd Bytes/Sec & Messages/Sec

02-bytessec02-messagessec

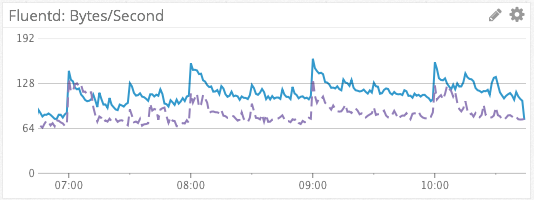
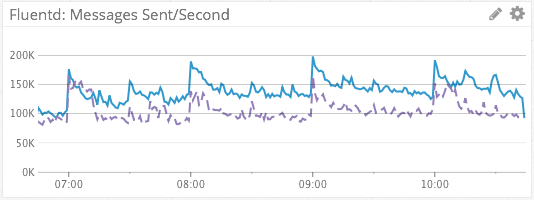
We visualize the sum of Fluentd bytes/sec and messages/sec across dimensions using the default, line graph visualization type, as rates. This simple, aggregated metric gives us a simple visualization of log message throughput. The dashed line in purple provides a week-over-week comparison, for context.
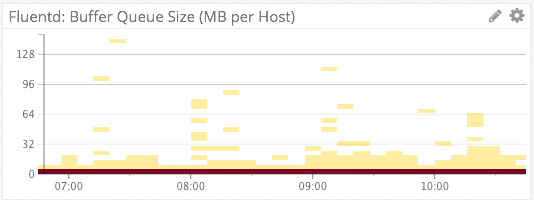
Fluentd Buffer Size

00-buffer-size-gb-by-role00-buffer-size-mb-by-host

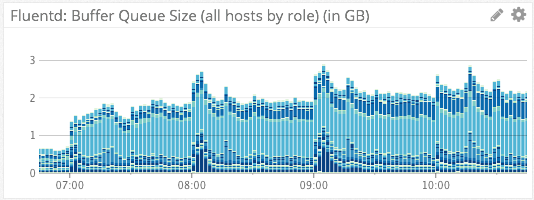
We visualize Fluentd’s on-host disk output buffer via the above two charts. The first chart uses the stacked bar visualization type, aggregated on “role”. The absolute height of each bar tells us the sum of all Fluentd disk buffers across an account. The individual components of each bar (the different shades of blue) each represent an individual role. From this we can quickly tell how much any individual role is contributing to the sum of all buffers.

The second chart uses the heat map visualization aggregated by “host”. Because Twilio operates thousands of instances in Amazon AWS, a line graph containing a separate series for each host would be far too noisy to derive any meaning from. This heat map visualization automatically scales from hundreds of hosts to thousands of hosts, while still maintaining the ability for an operator to derive meaning.

With regards to alerting, we have Datadog monitors setup to page us if the on-disk buffer of a given host reaches a critical threshold, or if the sum of all disk buffers across an account reaches a certain threshold. In our case, these alerts would be indicative of issues in forwarding log messages to AWS Kinesis.

Fluentd Retries

00-fluentd-retries-by-host-2

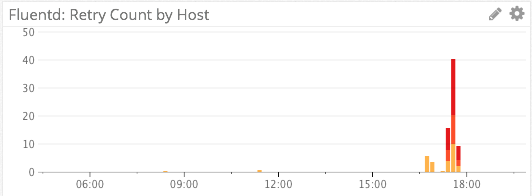
We specifically do not use a line graph for visualizing retries, as retries are relatively infrequent events and the line graph visualization would try to connect/interpolate points with lines.

Instead, we visualize Fluentd retries via a stacked bar graph. The absolute height of the graph shows us the number of retries, and each colored segment of the stack represents a distinct host.

A red color palette for the bars was chosen instead of the default blue color palette to indicate impending doom. 🙂

Fluentd CPU & Memory Consumption

01-fluentd-cpu01-fluentd-rss-memory

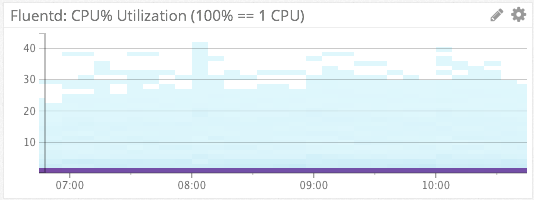
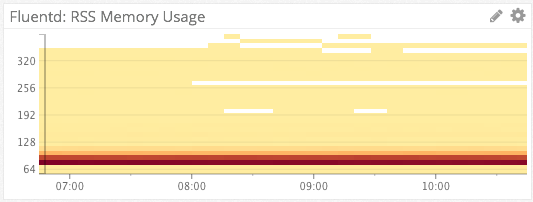
For Fluentd %CPU & memory consumption, we again turn the the heat map visualization type. Because each of these heat maps is aggregated by host, they can represent thousands of hosts in a simple chart. Ex: From the bottom chart we see that on the vast majority of hosts, Fluentd is consuming 70-90MB of RSS memory.

We have Datadog monitors setup to alert us via Slack if Fluentd is consuming >80% of a single CPU on any host, or page us via PagerDuty if Fluentd’s memory consumption becomes unreasonable.

01-fluentd-cpu-distribution

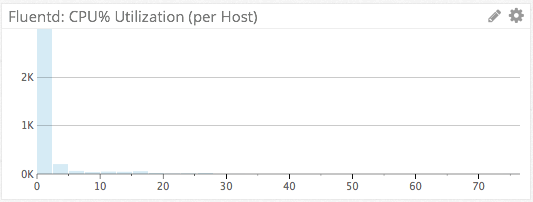
We can also use the distribution visualization type to view absolute numbers for the most recent sampling period. A distribution chart is basically a cross-section of the heat map chart rotated sideways, showing only a single period. This differs from the heat map in that a heat map shows evolution of the metric over time. Is this distribution, we can see that 2,000+ hosts have a Fluentd CPU utilization of <=5%, for the latest period.

Rollbar-Forwarder CPU & Memory Consumption

01-go-tail-rollbar-cpu01-go-tail-rollbar-memory

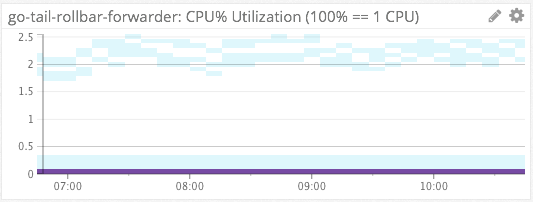
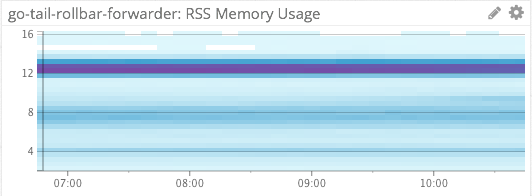
We similarly use heat maps to measure the %CPU and memory consumption of our file-tailing, rollbar-forwarder which is installed on each host.

Ingress vs Egress

04-fluentd_output_vs_bigquery_output_redacted

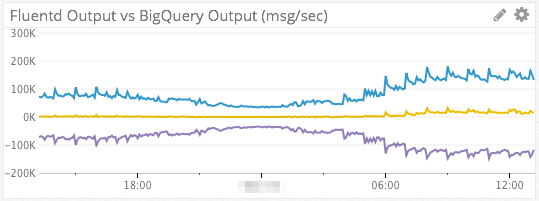
Since we use AWS Kinesis as a intermediate transport, it can be helpful to visualize data in-flow vs out-flow in order to determine where slow-downs in the data pipeline are happening.

The blue line in the chart above represents data flowing into Kinesis from Fluentd (ingress). The purple line at the bottom represents data read out of Kinesis by our Kinesis consumer (egress). The yellow line in the middle is a simple subtraction of the two series (B – A). If all is well and egress ~= ingress, then the yellow line should be right around 0.

The metrics for AWS Kinesis come from Datadog’s AWS integration.

Top Graphs & Change Graphs

04-most-active-logs-by-bytes

04-top10-roles-by-count

04-role-change-by-count

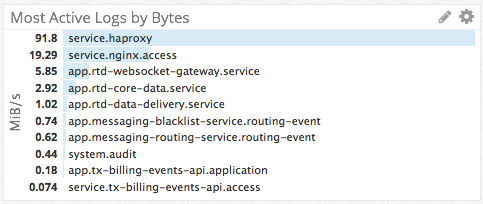
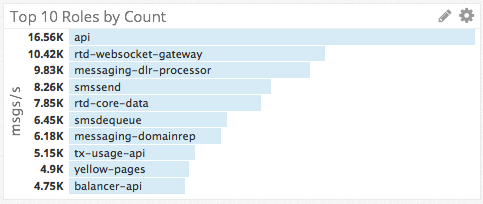
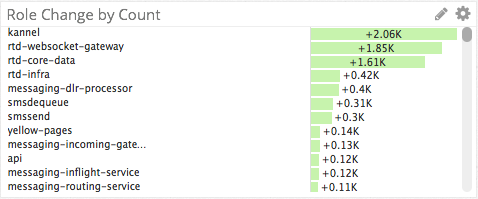
Thanks to the tags and dimensions we have applied to our metrics, we were able to create the top charts and change graphs to answer questions like:

  • What log file is the top source of log messages?
  • Which roles are the top producers of logs?
  • Which roles are contributing most to a sudden spike in log messages?

Alerting on Fluentd Issues with Rollbar

fluentd-rollbar

Using the go-tail-rollbar-forwarder app that I mentioned in part 1, we are able to get WARN/ERROR/CRIT log messages from Fluentd’s own log file into a SaaS service, so that we can be automatically notified about Fluentd issues. Other benefits of using Rollbar are that Rollbar will automatically aggregate and group similar messages from different hosts (see message about “1,000 occurrences…” above), and save us from having to log into machines to view Fluentd’s application log.

Since Rollbar was designed to be used by a logging library (Ex: log4j) and not as log aggregation service, we had to configure custom grouping rules to get Rollbar to group similar messages correctly. This was relatively simple to do using regex’s, but I mention it here for the sake of completeness.

Conclusion

I hope you found this guide on how to monitor Fluentd with Datadog and Rollbar to be helpful. If you’ve made it this far in the post, I’ll reward you by leaving you with some wisdom on monitoring:

Start with questions, don’t start with metrics.

If you start with metrics, the temptation will be to make a dashboard with a bunch of line graphs and call it a day. If you start with questions, however, you’ll be forced to work backwards and figure out if you even have the metrics, instrumentation, tags/dimensions, etc to be able to answer that question.

Ex: Using the metrics that we discussed in this post one could answer the question, “How many hosts are running Fluentd in my infrastructure?”. I guarantee you, however, that if you started with the raw metrics, you would never end up with a Datadog counter that showed you an absolute count of how many hosts are running Fluentd (Hint: Use “count(not_null(fluentd.messages.count{$host}))”). That is the value of starting with questions instead of metrics.

What are good ways to come up with insightful questions? One way that we came up with the questions that drove the creation of the charts in this post was through Chaos Game Day exercises. By practicing incident response in a controlled environment (ex: stage), we were able to learn what types of instrumentation and visualizations we needed in order to answer questions like, “Is the problem getting better or worse?” or “If the problem is getting better, what is the ETA until full recovery?”. When we did our first Game Day exercises we were not able to answer these questions, but in future simulations and real incidents, we were prepared!

If you don’t do Chaos Game Day exercises, ultimately you will have to learn in production when the real-deal incidents happen, and during your blameless post-mortems. The choice in how you’d like to prepare for these situations is yours.

redbug

Advanced Monitoring of Fluentd with Datadog and Rollbar : Part 1 : Instrumentation & Collection

(This post is part 1/2 in a series. For part 2, see: Part 2 : Visualizing & Alerting)

At Twilio, we use the open source log-forwarder Fluentd to forward billions of log messages per day from thousands of instances in Amazon AWS into Google BigQuery. Since the reliability of Fluentd is crucial to our operations, we have extensive monitoring and alerting around the Fluentd process running on each host. This blog post is a write-up of how we monitor Fluentd at scale, using both Datadog and Rollbar.

Datadog’s Builtin Integrations

Datadog provides several built-in, easy to setup integrations that we can use for monitoring Fluentd. Here are the two primary integrations that we use:

Datadog-Fluentd Integration

The Datadog-Fluentd integration provides several metrics from Fluentd:

  • fluentd.retry_count (gauge)
  • fluentd.buffer_total_queued_size (gauge)
  • fluentd.buffer_queue_length (gauge)

To setup this integration:

# /etc/fluent/config.d/src/source-monitor-agent.conf
---
<source>
  type monitor_agent
  bind 127.0.0.1
  port 19837
</source>


# /etc/dd-agent/conf.d/fluentd.yaml
---
instances:
  - monitor_agent_url: http://127.0.0.1:19837/api/plugins.json

init_config:

Datadog Process Check

The Datadog Process Check captures metrics from specific running processes on a system, such as CPU %, memory usage, and disk I/O. We can use this to monitor the CPU & memory overhead of the Fluentd process itself.

This integration is also very easy to setup. Just configure the Datadog agent (dd-agent) on your host(s) to collect stats on your Fluentd process:

# /etc/dd-agent/conf.d/process.yaml
---
instances:
- name: fluentd
  search_string:
    - /usr/local/bin/fluentd
  exact_match: 'False'

init_config:

If this integration isn’t working for you, you likely have the wrong process name listed for your Fluentd process. You can determine which process name the dd-agent would match against by running the following snippet:

#!/opt/datadog-agent/embedded/bin/python

import psutil

for proc in psutil.process_iter():
    print proc.cmdline()

Metrics on Messages/Sec & Bytes/Sec

While the above metrics for CPU, memory, buffer size, and retries are helpful, none of them allow us to answer one of the most basic questions one would hope to answer: How many messages/sec or bytes/sec of log messages is a given host (or cluster) forwarding?

In order to answer that operational question, we had to build a creative solution:

1. For all messages that are forwarded to our typical output destination (ex. AWS Kinesis, Google BigQuery, etc), use Fluentd’s built-in copy plugin to also send those messages to fluent-plugin-flowcounter. Fluent-plugin-flowcounter will then emit new messages with metrics for bytes/sec and messages/sec as key/value pairs under a new tag, ex: “flowcount”.

<match app.* system.* service.*>
  @type copy

  <store>
    @type flowcounter
    tag flowcount
    aggregate tag
    output_style tagged
    count_keys *
    unit second
  </store>

  <store>
    @type kinesis_streams
    ...
  </store>
</match>

2. Create a new match rule against those “flowcount” messages. This rule will duplicate each of those messages with new tags, “myproject.fluentd.messages.bytes” and “myproject.fluentd.messages.count”. We do this because metrics for bytes and message count must be submitted to Datadog as separate metrics.

#
# Match messages that came from the "flowcounter" plugin and duplicate them.
# The resulting messages should have different tags though, so that we can
# process them separately.
#
<match flowcount>
  @type copy

  #
  # Need to "deep copy", otherwise the <store>s below will share & modify
  # the same record. This is bad because we need to modify the new
  # "bytes"/"count" records separately.
  #
  deep_copy true

  <store>
    type record_modifier
    tag quantico.fluentd.messages.bytes
  </store>
  <store>
    type record_modifier
    tag quantico.fluentd.messages.count
  </store>
</match>

3. Create a filter rule to match “myproject.fluentd.messages.*” (both variants that we produced in step #2). Use the record_transformer plugin to transform the “fluentd.messages.count” messages into messages that simply contain the message count metric, and “fluentd.messages.bytes” messages into messages that only contain the bytes metric.

#
# Messages coming into here will have the form:
#
#     quantico.fluentd.messages.count: {
#         "count": 0,
#         "bytes": 0,
#         "count_rate": 0.0,
#         "bytes_rate": 0.0,
#         "tag": "syslog.messages"
#     }
#
# ... where metrics for both "bytes" and "count" are packed into the same
# message.
#
# Since the Datadog statsd plugin can only handle 1 metric/message, we must
# duplicate the flowcount message and tag the resulting messages for either
# "count" or "bytes", respectively.
#
# Those resulting duplicated events then come here for additional
# transformations:
#
#     * Add a new JSON key named "value", whose value is the respective
#       count/bytes value, taken from the key "count" or "bytes".
#     * Rename the key named "tag" into "fluentd-tag". This will result in a
#       Datadog metric-tag named "fluentd-tag" which we can then pivot on.
#       Ex: {"fluentd-tag": "system.messages"}
#     * Drop the original keys: "bytes,bytes_rate,count,count_rate". If not
#       removed, they would show up as distinct metrics tags in Datadog and
#       given that they would have values of varying sizes, this would cause
#       our number of tracked metrics (and associated $$ costs) in Datadog to
#       grow unbounded.
#
# The resulting messages will have the following format, which we can then
# <match> into the "dogstatsd" output plugin, for shipping off to the local
# "statsd":
#
#     quantico.fluentd.messages.count: {
#         "fluentd-tag": "system.messages",
#         "value": "20"
#     }
#
#
<filter quantico.fluentd.messages.*>
  @type record_transformer
  enable_ruby true
  remove_keys bytes,bytes_rate,count,count_rate,tag

  <record>
    value ${record[tag_parts[3]]}
  </record>
  <record>
    fluentd-tag ${record['tag']}
  </record>
</filter>

4. A final match rule to accept those “myproject.fluentd.message.*” messages, and emit them to the local dogstatsd process as a counter metric (XXX), which will then automatically forward the metrics to Datadog.

#
# Send messages like "quantico.fluentd.messages.count" to the local dogstatsd
# daemon.
#
<match quantico.fluentd.**>
  @type dogstatsd
  port 8125
  host localhost
  metric_type count
  flat_tags true
  use_tag_as_key true
  value_key value

  #
  # The default flush interval of all fluentd output plugins is 60 seconds
  # which is far too infrequent for dogstatsd, which flushes to the Datadog
  # service every 10 seconds. Without a shorter "flush_interval" here,
  # metrics in Datadog will only appear every 60 seconds, with 0's padded
  # in between each data point. Yuk.
  #
  flush_interval 5s
</match>

One thing to note about the message that is pushed to dogstatsd plugin, and our use of “flat_tags true”. For the sample message below, the dogstatsd plugin will convert “fluentd-tag” into a tag on the Datadog metric. This means that we will be able to aggregate our Datadog dashboards on Fluentd tags, and enable us to get metrics on specific log files. Ex: Count/bytes for “fluentd-tag” of “nginx.access”, “haproxy”, “system.messages”, or “*”!

quantico.fluentd.messages.count: {
    "fluentd-tag": "system.messages",
    "value": "20"
}

Monitoring Fluentd’s Log File Itself with Rollbar

A final issue that we thought of: The Fluentd process itself has a log file. What if Fluentd emits errors or exceptions on any of our thousands of AWS instances? How would we ever find out? We certainly couldn’t trust Fluentd to forward it own logs in these situations, so therefore we needed an external and independent destination for Fluentd’s logs.

To solve this problem, I wrote a small GoLang app called “go-tail-rollbar-forwarder” which does exactly what its name implies: It uses the hpcloud/tail library to efficiently tail files from the file system, and if it finds ERROR or CRIT messages, it forwards those messages to Rollbar, a software error-tracking SaaS (Sentry could also be used).

This being the first GoLang app I’d written of any significance, I also setup Datadog process checks to measure CPU & RSS memory metrics of this process. I’m delighted to say that after 8 months of running on thousands of instances, we’ve never had any problems with resource consumption of “go-tail-rollbar-forwarder”. According to our heat maps in Datadog, this process typically uses just ~12MB of RSS memory, and <1% of a single CPU.

The Next Steps

This guide covered how to instrument and collect metrics and error messages from Fluentd. In Part 2 of this guide, we will cover best practices around visualizing and alerting on those metrics and messages. On to Advanced Monitoring of Fluentd with Datadog and Rollbar : Part 2 : Visualizing & Alerting.

redbug

Automating Linux Security Best Practices with Ansible

Suppose you’re setting up a new Linux server in Amazon AWS, Digital Ocean, or even within your private network. What are some of the low-hanging fruits one can knock-out to improve the security of a Linux system? One of my favorite posts on this topic is “My First 5 Minutes On A Server; Or, Essential Security for Linux Servers“.

In that post Bryan Kennedy provides several tips, including:

  • Installing fail2ban – a daemon that monitors login attempts to a server and blocks suspicious activity as it occurs.
  • Modifying the configuration of “sshd” to permit neither “root” logins, nor password-based logins (ie. allow authentication with key-pairs only).
  • Configuring a software-based firewall with “iptables”.
  • Enabling automatic software security updates through the OS’s package manager.

These all seem like sane things to do on any new server, but how can one automate these steps for all of the machines in their infrastructure for speed, review-ability, and consistency? How can one do this in a way that allows them to easily modify the above rules for the different types of machines in their environment (ex. web servers should have port 80 open, but DB servers should have port 5432 open)? What’re some gotchas to be aware of when doing this? Here are my notes on how to automatically bring these security best practices to the Linux machines in your infrastructure, using Ansible.

Community-Contributed Roles which Implement the Best Practices

The first rule of automating anything is: Don’t write a single line of code. Instead, see if someone else has already done the work for you. It turns out that Ansible Galaxy serves us well here.

Ansible Galaxy is full of community-contributed roles, and as it relates this this post there are existing roles which implement each of the best practices that were named above:

Combining these well-maintained, open source roles, we can automate the implementation of the best practices from Bryan Kennedy’s blog post.

Making Security Best-Practices your Default

The pattern that I would use to automatically incorporate these third-party roles into your infrastructure would be to make these roles dependancies of a “common” role that gets applied to all machines in your inventory. A “common” role is a good place to put all sorts of default-y configuration, like setting up your servers to use NTP, install VMware Tools, etc.

Assuming that your common role is called “my-company.common” making these third-party roles dependancies is as simple as the following:

# requirements.yml
---
- src: franklinkim.ufw
- src: jnv.unattended-upgrades
- src: tersmitten.fail2ban
- src: willshersystems.sshd

# roles/my-company.common/meta/main.yml
---
dependencies:
  - { role: franklinkim.ufw }
  - { role: jnv.unattended-upgrades }
  - { role: tersmitten.fail2ban }
  - { role: willshersystems.sshd }

Wow, that was easy! All of Bryan Kennedy’s best practices can be implemented with just two files: One for downloading the required roles from Ansible Galaxy, and the other for including those roles for execution.

Creating Your Own Default Configuration for Security-Related Roles

Each of those roles comes with their own respective default configuration. That configuration can be seen by looking through the “defaults/main.yml” directory in each role’s respective GitHub repo.

Suppose you wanted to provide your own configuration for these roles which overrides the author’s defaults. How would you do that? A good place to put your own defaults for the configuration of your infrastructure is in the “group_vars/all” file in your Ansible repo. The “group_vars/all” file defines variables which will take precedence and override the  variables from the roles themselves.

The variable names and structure can be obtained by reading the docs for each respective role. Here’s an example of what your custom default security configuration might look like:

# group_vars/all
---
# Configure "franklinkim.ufw"
ufw_default_input_policy: DROP
ufw_default_output_policy: ACCEPT
ufw_default_forward_policy: DROP
ufw_rules:
  - { ip: '127.0.0.1/8', rule: allow }
  - { port: 22, rule: allow }

# Configure "jnv.unattended-upgrades"
unattended_automatic_reboot: false
unattended_package_blacklist: [jenkins, nginx]
unattended_mail: 'it-alerts@your-company.com'
unattended_mail_only_on_error: true

# Configure "tersmitten.fail2ban"
fail2ban_bantime: 600
fail2ban_maxretry: 3
fail2ban_services:
  - name: ssh
    enabled: true
    port: ssh
    filter: sshd
    logpath: /var/log/auth.log
    maxretry: 6
    findtime: 600

# Configure "willshersystems.sshd"
sshd_defaults:
  Port: 22
  Protocol: 2
  HostKey:
    - /etc/ssh/ssh_host_rsa_key
    - /etc/ssh/ssh_host_dsa_key
    - /etc/ssh/ssh_host_ecdsa_key
    - /etc/ssh/ssh_host_ed25519_key
  UsePrivilegeSeparation: yes
  KeyRegenerationInterval: 3600
  ServerKeyBits: 1024
  SyslogFacility: AUTH
  LogLevel: INFO
  LoginGraceTime: 120
  PermitRootLogin: no
  PasswordAuthentication: no
  StrictModes: yes
  RSAAuthentication: yes
  PubkeyAuthentication: yes
  IgnoreRhosts: yes
  RhostsRSAAuthentication: no
  HostbasedAuthentication: no
  PermitEmptyPasswords: no
  ChallengeResponseAuthentication: no
  X11Forwarding: no
  PrintMotd: yes
  PrintLastLog: yes
  TCPKeepAlive: yes
  AcceptEnv: LANG LC_*
  Subsystem: "sftp {{ sshd_sftp_server }}"
  UsePAM: yes

The above should be tailored to your needs, but hopefully you get the idea. By placing the above content in your “group_vars/all” file, it will provide the default security configuration for every machine in your infrastructure (ie. every member of the group “all”).

Overriding Your Own Defaults for Sub-Groups

The above configuration provides a good baseline of defaults for any machine in your infrastructure, but what about machines that need modifications or exceptions to these rules? Ex: Your HTTP servers need to have firewall rules that allow for traffic on ports 80 & 443, PostgreSQL servers need firewall rules for port 5432, or maybe there’s some random machine that needs X11 forwarding over SSH turned on. How can we override our own defaults?

We can continue to use the power of “group_vars” and “host_vars” to model the configuration for subsets of machines. If, for example, we wanted our web servers to have ports 80 &443 open, but PostgreSQL servers have port 5432 open, we could override the variables from “group_vars/all” with respective variables in “group_vars/webservers” and “group_vars/postgresql-servers”. Ex:

# "group_vars/webservers"
---
ufw_rules:
  - { ip: '127.0.0.1/8', rule: allow }
  - { port: 22, rule: allow }
  - { port: 80, rule: allow }
  - { port: 443, rule: allow }

===
# "group_vars/postgresql-servers"
---
ufw_rules:
  - { ip: '127.0.0.1/8', rule: allow }
  - { port: 22, rule: allow }
  - { port: 5432, rule: allow }

Rules for individual hosts can be set using “host_vars/<hostname>”. Ex: “host_vars/nat-proxy1.your-company.com”

# host_vars/nat-proxy1.your-company.com
---
# Allow IP traffic forwarding for our NAT proxy
ufw_default_forward_policy: ACCEPT

Ansible’s “group_vars”, “host_vars”, and variable precedence are a pretty powerful features. For additional readings, see:

Gotchas

There are a couple of “gotchas” to be aware of with the aforementioned scheme:

  1. Variable replacing vs. merging – When Ansible is applying the precedence of variables from different contexts, it will use variable “replacement” as the default behavior. This makes sense in the context of scalar variables like strings and integers, but may surprise you in the context of hashes where you might have expected the sub-keys to be automatically merged. If you want your hashes to be merged then you need to set “hash_behaviour=merge” in your “ansible.cfg” file. Be warned that this is a global setting though.
  2. Don’t ever forget to leave port 22 open for SSH – Building upon the first gotcha: Knowing that variables are replaced and not merged, you must to remember to always include an “allow” rule for port 22 when overriding the “ufw_rules” variable. Ex:
    ufw_rules:
      - { ip: '127.0.0.1/8', rule: allow }
      - { port: 22, rule: allow }

    Omitting the rule for port 22 may leave your machine unreachable, except via console.

  3. Unattended upgrades for daemons – Unattended security upgrades are a great way to keep you protected from the next #HeartBleed or #ShellShock security vulnerability. Unfortunately unattended upgrades can themselves cause outages.
    Imagine, for example, that you have unattended upgrades enabled on a machine with Jenkins and/or nginx installed: When the OS’s package manager goes to check for potential upgrades and finds that a new version of Jenkins/nginx is available, it will merrily go ahead and upgrade your package, which in-turn will likely cause the package’s install/upgrade script to restart your service, thus causing a temporary and unexpected downtime. Oops!
    You can prevent specific packages from bring automatically upgraded by listing them in the variable, “unattended_package_blacklist”. This is especially useful for daemons. Ex:

    unattended_package_blacklist: [jenkins, nginx]
    

Conclusion

Ansible and the community-contributed code at Ansible Galaxy make it quick and easy to implement the best-practices described at “My First 5 Minutes On A Server; Or, Essential Security for Linux Servers“. Ansible’s notion of “group_vars”, “host_vars”, and variable precedence provides a powerful way for one to configure these security best-practices for groups of machines in their infrastructure. Using all of these together one can automate & codify the security configuration of their machines for speed of deployment, review-ability, and consistency.

What other sorts of best-practices would be good to implement across your infrastructure? Feel free to leave comments below. Thanks!

ansible_logo_black_square